Cars need battery power, and car batteries eventually wear out. This is a plain fact of automotive technology. There are many reasons a battery goes flat: It could be old and worn out; it could have a slow drain that draws out power even when you’re not using it, or you may not be using the car often enough to keep the battery charged. Whatever the case may be, so long as your battery will still accept a charge, we can jump-start it.
Why is the procedure called ‘jump-start?’ That’s because it requires the use of jumper cables.
Jumper cables are two long cables with alligator clamps on each end. Their function is to conduct electric power from a good battery to a flat battery, providing enough charge to the latter to start the stalled car. More often than not, jumper cables are color-coded: One is red, the other is black. These colors correspond with the battery terminals, which are also color-coded red and black. The colors denote the negative and positive poles of the battery: Red for positive, black for negative.
Step 1: Park the vehicles next to each other.
Park the functioning car so that the vehicles face each other, preferably only about 18 inches apart, but never touching each other. For automatic transmission cars, put the vehicle in park; for a manual transmission, set the vehicle to neutral. Set the parking brakes on both, so neither car moves unexpectedly.
Step 2: Both vehicles should be off. Set the parking brakes
Both cars should be turned off, with keys removed. Set down the jumper cables on the ground, making sure the clamps do not touch each other.
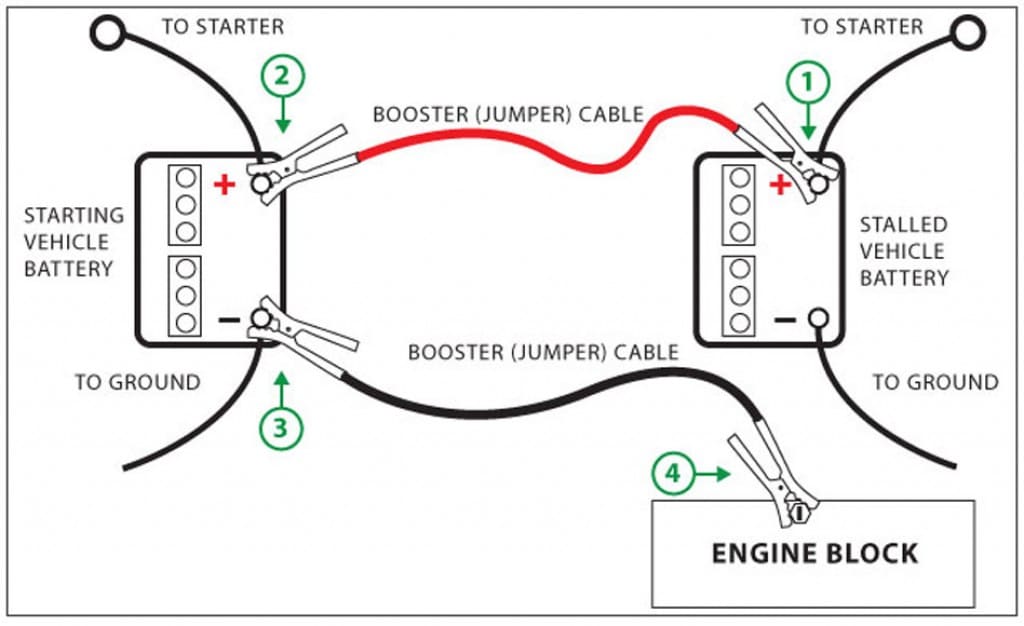
Now, begin attaching the jumper cables:
Open the hood to both cars, and locate the batteries (refer to the owner’s manual for battery location) and battery terminals. Usually, the two terminals on each battery will be covered in red or black, with a + or – sign on top. Look at the batteries and make sure that you can identify which is positive, and which is negative. This distinction is crucial to the success of your jump. If the battery
terminals are dirty, wipe them off with a rag or wire brush.
Step 3: Attach one red clamp to the positive terminal on the dead battery.
Attach the red, positive cable clamp to the positive (+) battery terminal of the dead battery. You want a solid connection to the battery terminal, which may require some initial wiggling of the clamps
Step 4: Attach the other red clamp to the positive terminal on the working battery.
Attach the red, positive cable clamp on the other side of the jumper cables to the functioning vehicle’s positive (+) battery terminal
Step 5: Attach the partnered black clamp to the negative terminal on the working battery.
Connect the black, negative cable clamp to the working battery’s negative (-) battery terminal.
Step 6: Attach the partnered black clamp to a clean nut or bolt on the engine block.
Walk over to the car with the dead battery. Do not connect the black, negative cable clamp to the dead battery. Instead, attach that clamp to an unpainted, metal part of the car such as a shiny, clean nut on the engine block. This will help ensure a safe jump.
Step 7: Start the working vehicle and let it run for a few seconds.
Start the working vehicle. Wait a minute or so. Depending on the age of the battery and how long since it died, you may need to let the car run for a minute or two to get the jump to work.
Step 8: Start the dead vehicle. It should turn on.
Try starting the dead car. If the car doesn’t start, allow the working vehicle to charge the battery for an additional minute or two before attempting again.
Step 9: If it doesn’t turn on, try revving the engine of the working vehicle.
In some instances, slightly revving the engine of the working car while charging the dead battery may help.
Step 10: Disconnect the black jumper cables first, then disconnect the red ones.
Once the dead car is running, you may disconnect the jumper cables, starting with the black, negative cable clamps. Do not let the clamps touch each other while any part of the cables is still attached to a car.
Step 11: Take a short drive to help recharge the battery.
Now, take a short drive. This will allow the battery to build up a charge. This driving allows the vehicle’s alternator to charge the battery and ensures that your vehicle does not die again once you turn it off.

Mr. Mechanic can come to you for any vehicle repair, service, roadworthy certificate, and inspection needs. Call us for a free quote!